Is your kitchen in need of new countertops? If you’re the creative type, you could make your own butcher block countertops using wood, a few tools and these free step-by-step instructions for how to make a wood countertop.

Tools and Supplies You Will Need to Make a Wood Countertop:
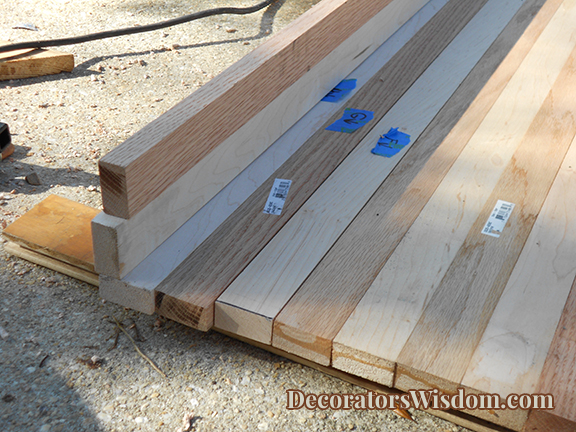
- Wood; for our butcher block countertops, we chose to use alternating boards of maple and oak wood. This makes a subtle striped pattern that we think is really sophisticated and appealing. You should choose wood that complements the rest of your kitchen furnishings well.
- Wood clamps
- Tape measure
- Masking tape or painter’s tape
- Pen or Scribe
- Right Angle
- 1 to 2 levels at least 2′ each
- Drill
- Doweling Jig + 1/4″ Dowel
- Wood Glue Waterproof (i.e Titebond III Ultimate) 1 gallon
- Rubber Mallet
- Chop Saw or Circular or fine hand saw
- Jig Saw or Hand Coping Saw
- Adjustable Height Hand Router + Rabbeting Bit
- Belt Sander & assorted belts
- Bench or Hand Planer
- Sponge and Rags
- Sealer (i.e. mineral oil, wax, Polyurathane) *If you plan to cut on it or put food directly on the surface of the counter, use only a non toxic sealer such as mineral oil.
- Optional: New paint for the walls, cabinetry and other surfaces surrounding the countertops
Kitchen Layout Notes
Our kitchen features a straight-across layout with no corners, which makes for a simple kitchen countertop design. If you’re designing wood countertops for a u-shaped kitchen or another kitchen layout that requires corners, you’ll have to do some additional planning to figure out how to design your corners. If you’re creating a striped pattern like ours, you’ll also need to figure out how to lay out your stripes. We suggest mitered corners as one possibility, although there are many other possibilities that would also be really cool.
Free Instructions for How to Make Wood Countertops
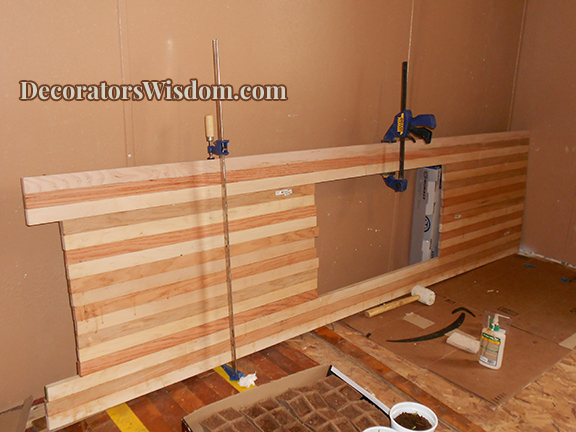
Step 1 — Measure your existing counter top, or if this is a new install determine the dimensions of the counter top to order the correct amount of hardwood slats. Remember you can vary width, lengths and wood species to create some pretty amazing patterns, or go traditional if you like. That’s what we did. Be careful to properly calculate the dimensions required for the sink and any other items that might require you to create a gap, or possibly a hole or cut out. Also don’t forget the backsplash can be made out of wood. We added a right angle piece in the front for more dimension. Note – The sink is too large to run boards across and then waste the wood cutting it out. Wood is expensive and precious, so try not to waste it needlessly.
Step 2 — Cut your wood to the correct lengths using your chop saw, circular saw or fine hand saw.
Step 3 — Begin setting up your doweling jig, and run dowels anywhere from 4-6″ apart, using your 1/4″ guide. If your wood is thicker than 3/4″ you can opt for a larger size.


Step 4 — Use masking or paper tape and a marker to label the pieces in order, and use an arrow to indicate the direction of all the pieces. Do not forget, or it will be like assembling a million piece puzzle.
Step 5 — Glue up each piece with your dowels using a rubber mallet to hammer down the dowels, and then to hammer each labeled slat together and then apply your wood clamps. I found it was easier to keep my pieces no more than 1-2 feet during glue up to ensure they were straight using a level clamped on. Later I would glue / dowel the larger pieces together. Note I didn’t have the luxury of a straight bench and was working off the driveway.

Step 6 — Hand Plane if needed, and / or use your belt sander to level. Next fine sand for finish.
Step 7 — Use your sealer of choice, but again if you plan on cutting food on it, go non toxic like a mineral oil.
Step 8 — Use your jig saw or coping saw to trim the exact sink cutout.
Step 9 — Use your hand router with a rabbeting bit that has a bottom bearing. Adjust the height accordingly and the bearing diameter if need be to create a router cutout out that will allow the sink to be flush mounted.
Step 10 — Mount the counter top. We added a new hardwood floor that raised the walking height by 3/4″ so we’re opting to mount our board on top of the existing laminate counter. The existing countertop is 3/4″ thick, so it will provide the perfect height and an already level / waterproof surface below.
We’re working on installing hardwood flooring plus painting our surrounding walls and kitchen cabinetry, so we haven’t yet mounted our countertop and posted the final reveal. We invite you to sign up for our newsletter if you’d like to be sure of seeing what the kitchen looks like when the wood countertop is in place. As a newsletter subscriber, you can expect to receive periodic updates about all our most interesting content including this reveal, other DIY tutorials, future trend forecasts and trend reports, and interesting home decorating news.
So now you know how to build your own wood countertops. We hope this tutorial is helpful to you, whether you want to actually make your own kitchen countertops or you’re simply curious about the process of how to do it.


More Kitchen Remodeling Articles:
- Top kitchen design trends for 2019
- Kitchen styles
- Learn about granite for kitchen countertops and many other applications
- 8 Tips for getting the most from your kitchen remodel
This page was last updated on 10-22-2018.